 Google Image: Copy write Ken Bromley Art Supplies. Click image to enlarge.
History
A New England artist and teacher named Charles Hawthorne created the first palette knife. He taught his students to use thick broad strokes in their paintings with a putty knife. This tool was developed into a palette knife, which today comes in different heights, widths, and shapes and are known as Painting Knives. Today, the term palette and painting knife are used interchangeably.
The painting knife was very popular with Impressionist painters. Claude Monet, Pierre Auguste Renoir, Edgar Degas, and Paul Cezanne are just some of the established artists who use this technique. Impressionism was a type of painting style that would capture visual reality in terms of color and light, not line and form.
Impressionism:
- Captures light
- Captures time of day or mood
- fast, quick little strokes
- Keep colors seperate
What is a Painting Knife?
A painting knife is a springy, shaped, metal spatula attached to a wooden handle. Painters use this tool instead of brushes to create different effects. This technique is like applying peanut butter on bread. The knife can create thick applications of paint creating textures that brushes cannot.
Spring or Not to Spring?
Spring! A painting knife should be flexible in the blade. If the blade does not bounce back immediately, it is not a good quality knife. The more flexible the knife, the easier it will be to create texture. As you can see in the picture below, a narrow blade has more flexibility than a wider blade. The wider blade would be better used to spread large amounts of color. Learn more about the quality of painting knives
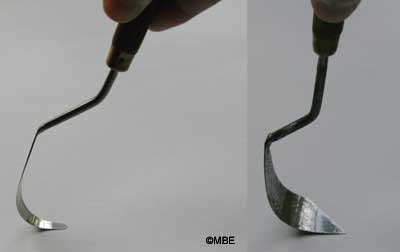
Image: Copy write 2008 Marion Boddy-Evans. Click Image to enlarge.
Painting Knife Shapes:
As you can see in the image at the top of the page, there is a great variety in the shapes of knives. Each knife, depending on the way it is used, creates different effects. Short blades make angled strokes, while long blades make it easy to place a large amount of color to the canvas. Rounded edges make it almost impossible to cut through canvas so it is acceptable to scrape into the paint with an edge. Although there are several knives to choose from, you typically would need only three of four, but it is hard to resist starting a collection.
Learn more about Knife Shapes
Applying the Knife to the Canvas:
Take the knife, scrape the paint up onto the knife from your palette. You may hold the knife however is comfortable, ut just make sure it is supported. Press the painted side of the blade onto the canvas. It’s that easy! If it is your first time using the knife. Experiment with different marks and textures on scrap canvas.
See Mark Making with a Knife
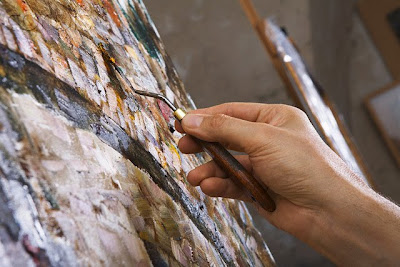 Image: Copy write Vladimir Godnik/moodboard/Corbis. Click image to enlarge.
Care for the Painting Knife
When you are finished painting, wipe away any paint that is left on the knife with a cloth or paper towel. It is much easier than cleaning brushes. If paint dries on the knife, just chip it away with another blade. Should the tip if a blade break, do not throw the knife away just yet. See if you can round the edge and make a new knife out of it.
Pre-planning
Pre-planning a composition is very important. The best way to do this is to create a series of thumbnail sketches. After deciding which composition to use, lightly sketch it onto the canvas using correct proportions and depth. Also, create several color thumbnail sketches to select the correct color palette for the painting.
Learn more about mixing colors
Techniques:
Texture:
Texture is usually created with a large, wide knife with mounds of paint on the blade. The paint is smoothed onto the canvas like icing on a cake. Lifting the blade slightly off the canvas while moving the tool can create fluid ridges that can start the beginning of a painting. It is important to remember to work wet-on-wet. This technique will not work on dry paint.
Layers:
You can create layers by starting with the darkest color and layering over a portion of the last swipe with a lighter color. You can use small quick strokes or long flat strokes.
Adding Detail:
Adding small amounts of paint on the top layer can create highlights. Scraping away paint, or sgraffito, can create lines, and movement. The way the blade leaves strokes of paint can also create movement.
Color Palette:
It is very important to choose a color palette for a painting. Of course you can add colors that are not on your palette, but it is a good idea to get obvious colors and shades of those colors mixed. The colors chosen will give the image a three dimensional look, as well as movement and characteristics.
Mark Making With a Knife: This page will show you all different ranges of marks that you can not create with a brush. The each mark mad by a knife in unique.
This is a painting of my teddy bear. I used a brush for the background, but most of the painting was done with the painting knife. I chose the brush to do the background because I did not want to take away the focal point of the bear. By Using the techniques above, I was able to create this painting. Notice the direction of the knife strokes. It really gives the bear a sense of three dimension, and movement, which also comes from the choice of color palette. He has certain characteristics that pop which can make this painting a self portrait.
 Image: Copy write 2008 Dina DiTaranto. "Teddy" Oil on Canvas. Click image to enlarge.
Questions for Discussion:
What is Impressionism and who are some famous artists from that era?
How should you pre-plan for a painting?
Why is a color palette important?
What is Sgraffito?
What is Impasto?
How do you clean the knife?
This is a triptych painting I created of Laguna Beach, done with the painting knife. Notice the short strokes and layers of paint used. Values of color are what make the image come to life. This is the style activity that you will be doing.
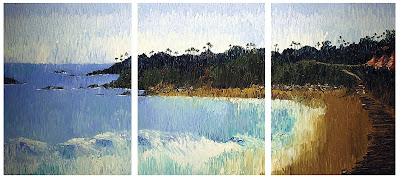 Image: Copy write 2008 Dina DiTaranto. "Laguna Beach" Oil on Canvas. Click image to enlarge.
Activity: Impressionistic Landscape
Materials Needed:
- Canvas
- Oil Paints
- Painting Knife (or knives)
- Thinners
- Picture of landscape
Directions:
- Choose an impressionistic landscape painting from one of the following, or do research and find your own.
Starry Night, Vincent Van Gogh
Water Lilies and Japanese Bridge, Claude Monet
Impression Sunrise, Claude Monet
View of Bougival, Pierre Auguste Renoir
Artist in Plein Air, Charles Hawthorne
- After choosing the painting, Review the artists style. Take notes on use of color, texture, thickness of paint, how the knife was used either large fluid strokes, or short tiny strokes, etc.
- Take a picture or find a picture of a landscape that appeals to you. Create a series of 5 thumbnail sketches (pencil and paper). Choose to do the whole image, or crop a section of the image.
- Pick the composition you like the most and lightly sketch it onto canvas (canvas size is your decision).
- With oil paint, create a color palette (Use different thumbnails to choose which colors will work the best).
- Use the painting knife only, and with the inspiration of the famous painting you reviewed, create your own impressionistic painting! NO BRUSHES!!

That's a great lesson idea~I love the painting you did of your teddy!
ReplyDeleteI really enjoy this lesson! It gives students a chance to break from rigid painting and encourages them to use expressionistic mark making, something I was never really introduced to as a student.
ReplyDelete